
|
Be the first user to complete this post
|
Add to List |
Setup nginx with multi domain websites running on nodejs
It's quite common to use NGINX in combination with several nodejs servers for hosting different applications. In this tutorial, I am going to show you how setup 2 or more websites on a single host using NGINX. The following is what we want to achieve at the end Using a single host (you can use a vps like digitalocean), we will be able to serve 2 websites
- my-new-website.com
- blog.my-new-website.com
Assumptions
- You have ssh access to a server, such as a vps provided by DigitalOcean.
- For sake of this tutorial, we also assume that the content of each of the websites mentioned above is its own nodejs process.
- You have setup your A and CNAME records correctly for the different websites through your hosting provider. If you don't know what those two terms are, take a look at this visualization which will help you understand them.
The concept
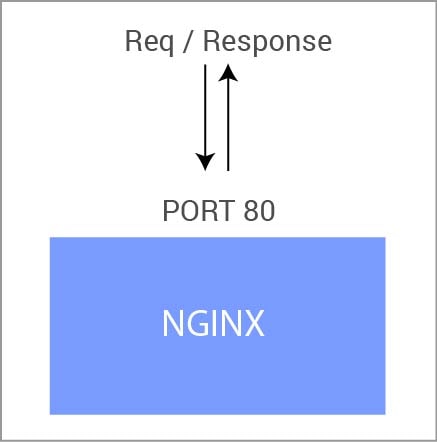
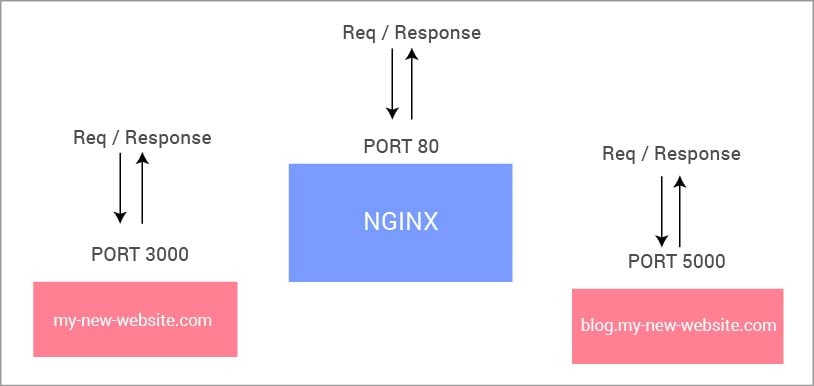
The trick to setting up NGINX to serve multiple websites is pretty straightforward.- You install NGINX.
- You allow it to listen on port 80.
- You setup other websites(or nodejs processes) to listen on other ports(always choose a port > 1024)
- You configure NGINX to forward incoming traffic on port 80 to the processes listening on the other ports depending on the URL that is being requested.
The setup
Step 1. Installing NGINX
You first need to install nginx. If you are on an ubuntu OS, you can do the followingsudo apt-get install nginx
sudo service nginx start
 TIP
To check your ip-address on an ubuntu os, you can run
TIP
To check your ip-address on an ubuntu os, you can run
ifconfig eth0 | grep inet | awk '{ print $2 }'
Step 2. Starting your applications
Now that NGINX is listening on port 80, we need to start our nodejs processes(or any other applications processes) and make them listen on different ports. For the sake of this example, lets say we use the following ports for our applications.- my-new-website.com : Port 300
- blog.my-new-website.com : Port 5000
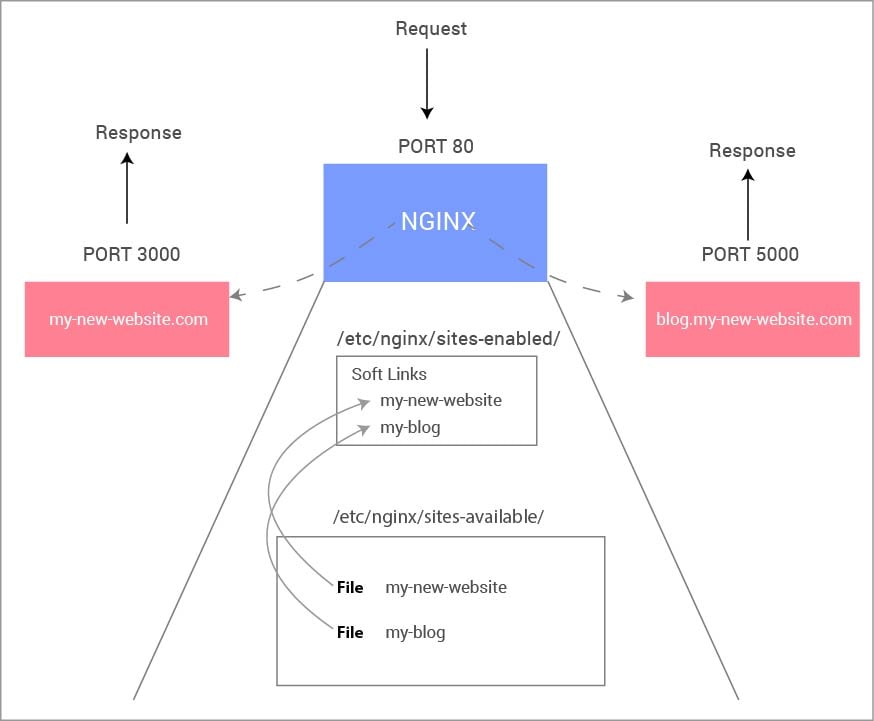
Step 3. Configure NGINX to forward requests to the different applications
This part is the meat of the matter so follow closely. NGINX has a notion of 'available sites' and 'enabled sites'. Conceptually you can think of `available sites' as a list of all sites that nginx server is aware of that are present locally. And 'enabled sites' represents a subset of the available sites that NGINX can forward to. To define my-new-website.com as an available site, you need to do the following - Create a new file, of any name you wish to, but preferably name it related to the name of the web app, in the directory/etc/nginx/sites-available. In our case, I will simply call the file my-new-website.
cd /etc/nginx/sites-available
touch my-new-website
vi my-new-website
- Place the following contents in that file
server {
    listen 0.0.0.0:80;
    server_name my-new-website.com;
    access_log /var/log/nginx/my-new-website.com.log;
    location / {
        proxy_set_header X-Real-IP $remote_addr;
        proxy_set_header HOST $http_host;
        proxy_set_header X-NginX-Proxy true;
        proxy_pass http://127.0.0.1:3000;
        proxy_redirect off;
    }
}
my-new-website in the configuration file above as well the the port number of 3000.
The above configuration file can be read as : For all incoming requests on port 80 with the hostname - my-new-website.com, re-route the request to port 3000.Now, lets also make the blog.my-new-website available to NGINX. I will call this file -
my-blog.
cd /etc/nginx/sites-available
touch my-blog
vi my-blog
server {
    listen 0.0.0.0:80;
    server_name blog.my-new-website.com;
    access_log /var/log/nginx/blog.my-new-website.com.log;
    location / {
        proxy_set_header X-Real-IP $remote_addr;
        proxy_set_header HOST $http_host;
        proxy_set_header X-NginX-Proxy true;
        proxy_pass http://127.0.0.1:5000;
        proxy_redirect off;
    }
}
NOTE: When creating soft links, make sure to use the full path for the source file else nginx will not be able to serve the enabled sites.
cd /etc/nginx
sudo ln -s /etc/nginx/sites-available/my-new-website sites-enabled/my-new-website
sudo ln -s /etc/nginx/sites-available/my-blog sites-enabled/my-blog
Restarting NGINX
Once all the above setup is done, simpy restart NGINX as followssudo service nginx restart
Glossary
Starting/stopping NGINXsudo service nginx start
sudo service nginx stop
sudo service nginx restart
sudo apt-get remove nginx
apt-get purge nginx nginx-common nginx-full
sudo apt-get nginx-common # If you removed the nginx-common, you will have to reinstall it
sudo apt-get install nginx
Also Read:
- Accessing the request body and session in nodejs using express
- Find the environment variables of a nodejs process in linux
- Testing promise sequence using mocha, chai, chai-as-promised, sinon
- Understanding routers in express 4.0 - Visually
- set the default node version using nvm